

The Night Sky - Episode 7
THE SLUMBERING DRAGON
This is episode 7 in my series on our night sky.
Here’s a video of a mysterious slumbering dragon in space. After watching the video, continue on to read about this fascinating deep-space object.
In the vast tapestry of the night sky, one celestial marvel stands out for its sheer size, intricate beauty, and enigmatic allure – IC1396. This emission nebula, nestled within the constellation Cepheus, paints the cosmos with its vibrant colours. Boasting beguiling structures that seem to dance across the cosmic canvas, IC13996 appears as a dragon resting on its back, slumbering in the cold lonely depths of space.

An image of IC1396. Over 8.5 hours of faint light from deep space were captured to create this image.
Image is at a 480mm field-of-view.
But there's more to this heavenly masterpiece than meets the eye. Its dimensions alone are enough to boggle the mind. At a distance of 2,400 light-years from Earth, it stretches across 3 degrees in the night sky – equivalent to six times the size of the full moon. The nebula’s true end-to-end diameter is ~100 light-years across, an expanse so vast it would engulf our entire solar system 8,000 times over!
IC1396's allure doesn't stop at its staggering expanse; it's also a stellar nursery of epic proportions. New stars are being born deep within its glowing interiors, their brilliance piercing through the nebulous tapestry that cradles them. The fiery dance of gas, dust, and radiation within this cosmic crucible is a sight to behold, a symphony of creation orchestrated by gravity that spans eons.
But what truly sets IC1396 apart is the interplay of matter and light that produces its resplendent appearance. To capture this breathtaking display, I embarked on an astrophotography journey that required a delicate balance of technology, patience, and a dash of cosmic luck.
The Capture Process
Capturing IC1396 was a bit of a project in itself. My primary imaging setup consisted of an astro-modified Canon 80D DSLR camera equipped with a Sigma 100-400 zoom lens to frame and capture the nebula’s expanse. I set the lens to 300mm, giving me an effective focal length of 480mm with the camera’s 1.6x crop factor. The camera's sensor modification, in which the stock IR-cut filter is removed, increases its sensitivity to wavelengths of light emitted by Hydrogen-alpha ions in the deep red part of the electromagnetic spectrum, the hallmark of star-forming regions and crucial for bringing out the nebula's striking structure.
I used an equatorial mount with guiding capabilities to eliminate star trailing during long exposures. The mount compensates for the Earth’s rotation and tracks the sky as it rotates at night. Guiding is a technique where a secondary camera (the guide camera) locks onto a guide star and constantly adjusts the mount’s tracking to align the deep-space target throughout the imaging process.
I also used the Optolong L-Enhance, a duo narrowband light filter, for this project. This filter effectively blocks large swaths of unwanted light pollution and emphasizes the nebula's intricate details by capturing specific wavelengths of light corresponding to Hydrogen-alpha and Oxygen-III emissions.
Traveling to Dark Sky Sites
One of the most crucial aspects of successful astrophotography is accessing dark sky sites with minimal light pollution. Travelling to a dark-sky site is paramount because it significantly enhances the quality of the final image. Reduced light pollution allows the camera to capture faint details and subtle colours that would otherwise be lost in light-polluted areas. The dark skies provide a pristine background, making the nebula stand out more vibrantly and allowing for longer exposure times without compromising image quality. The Bortle scale, ranging from class 1 (excellent dark skies) to class 9 (inner-city skies with severe light pollution), is used to gauge the quality of the night sky at a particular location.

The Bortle Scale showing the effects of light pollution and how it affects visibility of the night sky [credit: reference]
For my imaging sessions of IC1396, I ventured to a location with Bortle class 3 skies where light pollution is low.
Importance of Integration Times
Astrophotography requires long integration times, i.e. the total exposure time to create a single image, because more time means more photons of light captured. The longer the integration time, the higher the signal-to-noise ratio (SNR). This translates to a cleaner, more detailed final image.
[LEFT] Single image of a region in space showing lots of noise
[RIGHT] A stack of 100 images of the same region in space, noise is greatly reduced
IC1396, with its intricate structures and delicate features, benefits greatly from extended integration times. The nebula's faint regions require long exposures to unveil its hidden beauty and to bring out the subtle nuances in the gas and dust clouds. I captured over 100 frames, each of 5 mins duration for ~8.5 hours of integration time.
Post-Processing Astro Photos
After the arduous capture process, the real magic of astrophotography happens during the post-processing stage. This is where raw captured images are calibrated, integrated, and transformed into breathtaking celestial portraits using specialized software.
Steps 5, 6, and 7 in the workflow below elaborate on this process.
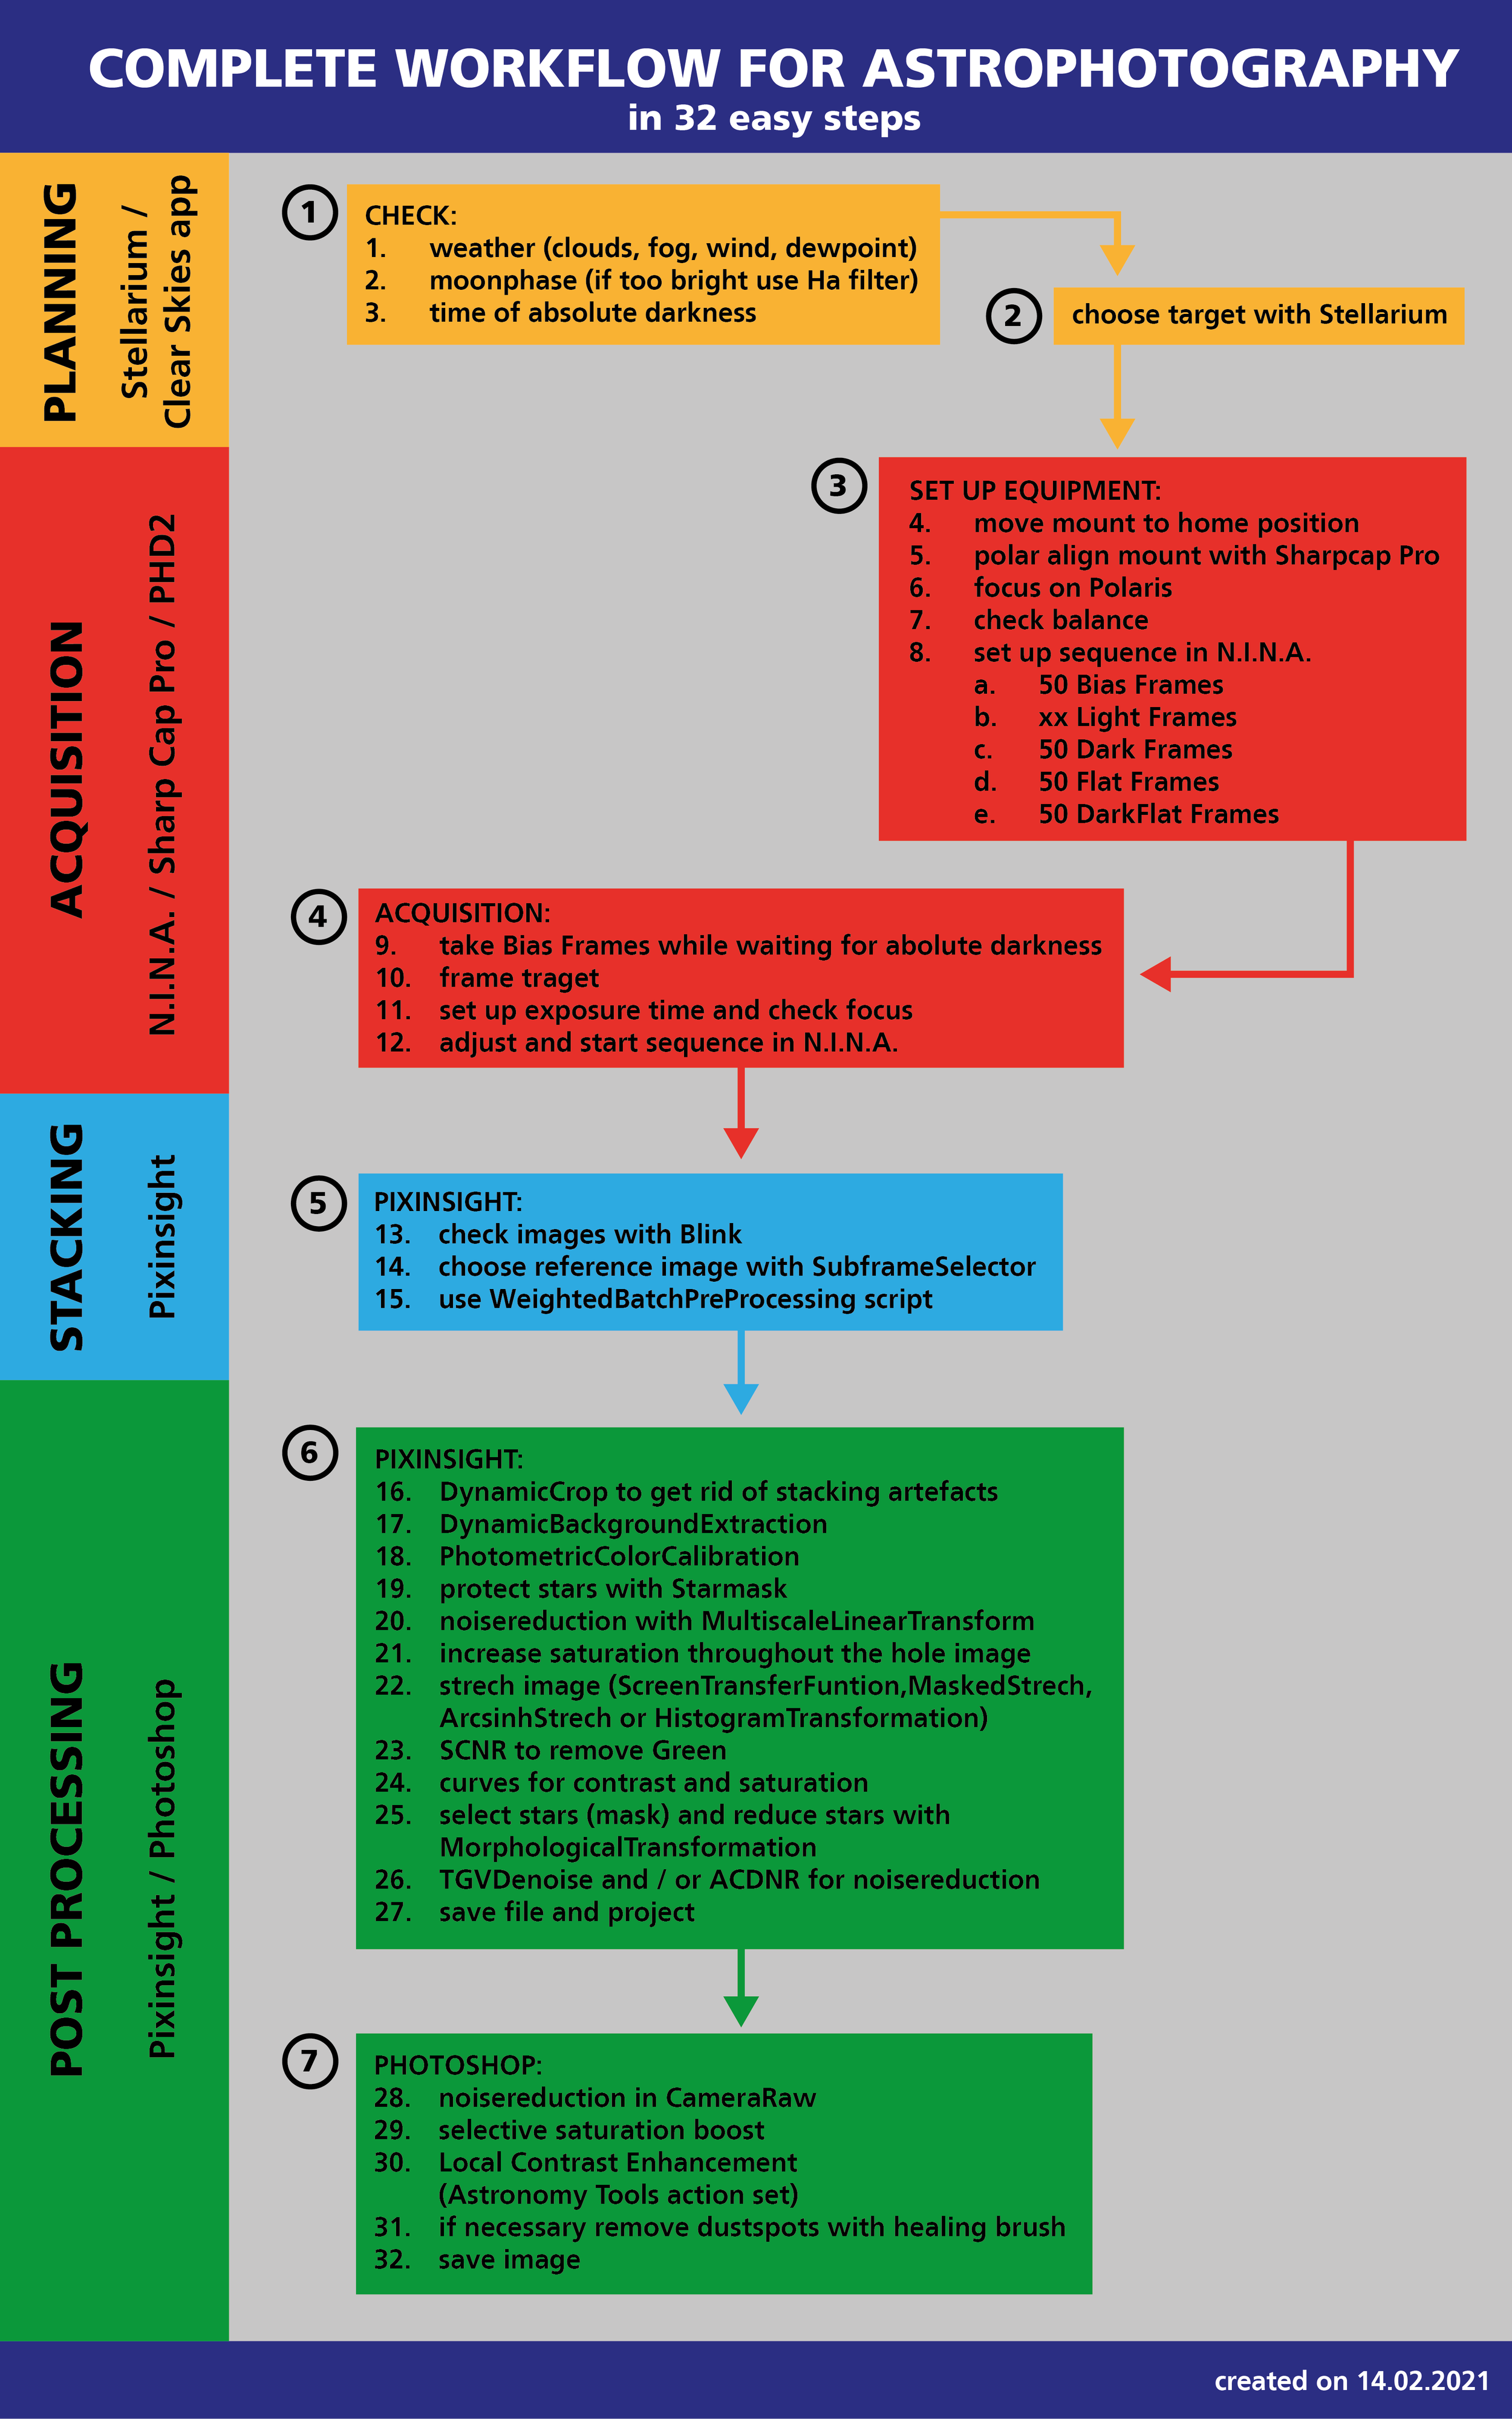
Workflow steps for astrophotography. Steps 5, 6, and 7 deal with image post-processing [credit: reference]
Broadly, all astrophotos go through at least the following steps.
We start with image calibration to remove any unwanted sensor artifacts and correct for imperfections in the imaging train. Three types of image calibration frames are created for this purpose.
Dark frames: To subtract out the dark current noise of the camera sensor
Flat frames: To neutralize the light fall-off and dust on the imaging train
Bias (or dark-flat) frames: To calibrate the flat frames
Deconvolution, a specialized process in astrophotography, helps enhance the sharpness and fine details of the image.
Noise reduction techniques are also applied to suppress unwanted background noise while preserving the faint details of the target.
Image stretching is a critical step in post-processing. It involves increasing the contrast and dynamic range of the image to reveal the intricate details and colour gradients within the deep-space target.
Star reduction is applied to mitigate the overwhelming presence of stars and allow the target to shine as the main subject.
And finally, artistic edits are made to balance contrast and saturation to perfect the image.
True Colour Images vs. SHO Palette
Astrophotographers often present their images using different colour palettes. Usually, false-colour palettes provide a distinct representation of the deep-space object highlighting specific elements in the captured data. On the other hand, true-colour images attempt to represent the deep-space object as closely as possible to how it would appear to the human eye.
The blue-gold image of IC1396 shown above is a false-colour image.
The image below shows a more realistic representation of how our eyes would see the nebula if it were sensitive enough to pick up colour at night.

A true-color image of IC1396. A dual narrowband filter (the Optolong L-Enhance) was used here to increase contrast between the nebula and the sky so as to overcome the effects of light pollution.
Image is at a 480mm field-of-view.
A note about false-color imaging in astrophotography:
The red hue, as seen in the image of IC1396 above, is common to most regions of space. This is because there is an abundance of hydrogen in space. When hydrogen atoms are excited by radiation from nearby stars, they are ionized and emit light in the deep red spectrum - at a wavelength of 656.46 nm, to be exact. This red light is known as the Hydrogen-alpha (h-alpha or Hα) emission line.
Other elements are present in deep-space objects and especially in nebulae - ionized sulfur (deeper red color than Hα) and ionized oxygen (blue-green color). The h-alpha emissions from the abundant hydrogen overpower light from other elements making most deep-space images appear red to our eyes. However, our eyes can only distinguish between about 16 shades of any given color. So, astrophotographers create false-color images of deep-space objects by mapping the emission lines of ionized sulfur, hydrogen, and oxygen to red, green, and blue respectively on the color wheel. This false-color mapping makes it much easier for our eyes to see intricate structures, dust lanes, and stellar activity.
In fact, there are many possible ways to map the emission lines to colors on the color wheel and different mappings will result in different false-color images. The sulfur→red, hydrogen→green, oxygen→blue mapping is one of the most commonly used mappings because it was popularized by NASA in their rendering of images of space beamed back to Earth by the Hubble space telescope. This mapping is therefore commonly known as the Hubble palette.
True color vs. SHO (Hubble) palette images of IC1396
The false-color version of IC1396 makes it easier for our eyes to pick out distinct regions in the nebula. Blue regions are rich in ionized oxygen, yellow-gold regions are rich in ionized hydrogen, and orange-red regions are rich in ionized sulfur.
Notable Deep-Space Objects within IC1396
IC1396 is home to several fascinating objects that astrophotographers can explore and capture. The survey image below shows some of these objects.

Annotated survey image of the region of IC1396. Yellow markers show IC and NGC objects. Red markers show H-II regions. Green markers show bright nebulae. White markers show prominent stars. Purple markers show planetary nebulae.
One of the most notable is the Elephant's Trunk Nebula (a.k.a. LBN 452), a dense cloud of gas and dust shaped like an elephant's elongated trunk. This and other bright nebulae are annotated in lime green.
Two notable stars are also visible, annotated in white. The first is μ Cep (a.k.a. Herschel’s Garnet Star a.k.a. HD206936) a massive red supergiant star at the nebula's edge. Its colour is so prominent that it appears as a reddish dot even to the naked eye when viewed under dark skies. The second is HD206267 a triple-star system at the nebula's center whose stellar winds are so ferocious that they are responsible for carving out the structure of IC1396 while stripping away all protoplanetary material in nearby star systems.
Finally, two planetary nebulae - a type of emission nebula consisting of an expanding, glowing shell of ionized gas ejected from red giant stars late in their lives - are also visible, annotated in purple.
There is much to learn about our universe by looking at the stars. So if you are an aspiring amateur astrophotographer, take that leap and venture into deep-space imaging to explore the wonders of celestial objects like IC1396. Armed with passion, knowledge, and a touch of cosmic curiosity, you too can embark on a journey to capture the mysteries of the universe. Embrace the challenges and enjoy the process, With each exposure, you're not just documenting light; you're weaving your own cosmic tale, contributing to the never-ending narrative of the cosmos itself.
I wish you clear skies.
Check out some other nebulae I have captured.
Capture details
Camera: Astro-modified Canon 80D
Lens: Sigma 100-400mm f/5-6.3 DG OS HSM
Focal length: 300mm (equivalent to 480mm full-frame)
f-Ratio: 6.3
ISO: 800
Sub-exposure length: 300 seconds
Number of exposures: Total of 102 light frames over two sessions using the Optolong L-Enhance filter
Total integration time: 8.5 hours
Calibration frames: 30 darks, 30 flats, 30 bias for each session
Mount: SkyWatcher Star Adventurer
Guide camera: ZWO 120mm mini
Guide scope: ZWO Mini Guide scope
Capture control: ZWO ASIAir Pro
Dew control: CooWoo dew heater
Sky quality: Bortle 3
Moon phase: No visible moon
Processing: PixInsight